Intro
I haven’t blogged properly about the $5 Raspberry Pi Zero computer yet, despite Tweeting non-stop about it. I will soon. In the meantime, I’ll just repeat that
It’s a major moment in computing
The inclusion of a free one on the cover of the MagPi Magazine will be remembered for years to come.
The town in which I live, Bandon, flooded again recently, because Ireland. I’ve had a simple Node.js app running on a Gen 1 Raspberry Pi B, scraping the Bandon Flood Warning site every 15 minutes for the past four years and saving the data in Google Fusion Tables.
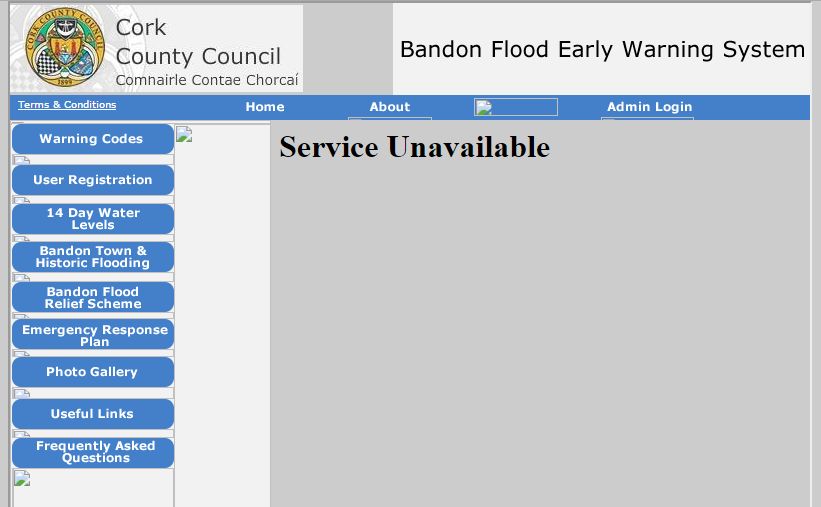
Yes that’s how Cork County Council’s/OPW’s Flood Warning site looks in the middle of one of our biggest floods ever:
With all this flooding, I decided to finally create a related setup which takes the SMS Flood alerts from the County Council and auto-tweets them to the @BandonFEWS Twitter account which I created and have manually updated since 2011.
The Details
So the final $7 hardware (including Wifi adapter) now looks as follows:

- My phone is registered with the Bandon Flood Warning site (it has been for years)
- I have a Twilio account with a $1 per month UK SMS number. Irish numbers are $6 per month :-(
- SMSes are sent to my phone from Cork CoCo announcing a new flood warning level or severe weather alert (two different systems and numbers)
- The Android Tasker App watches for SMS from these sources with particular contents
- Tasker auto-forwards these SMSes to my Twilio number

- I have the Twilio number configured to call a my simple API end-point with the SMS contents
- The API end-point is running on one of my $5 Raspberry Pi Zeros and is written in Go. Code below.
- The PiZero is behind my home router which is an Asus RT-AC68 so somehow Twilio had to connect through that to the Zero
- I initially setup a simple port forward to the Zero and I already use no-IP.com for Dynamic DNS. So Twilio called http://something.no-ip.net:1234 and my router passed the request to the PiZero server app on port blah
- The PiZero server app parsed the POST request and extracted out the SMS. It split this into multiple Tweets (a la Tweetstorm) if more than 140 chars and used the Anaconda Go client library to post that to @BandonFEWS on Twitter
- Done
But I wasn’t happy with http, nooooo, I wanted https and I wanted to use Let’s Encrypt. Cue rabbit hole.
Let’s Encrypt and Caddy
Let’s Encrypt offers free https certs.
It’s as revolutionary as the PiZero.
It also provides APIs so this can be done completely automatically. This resulted in lots of people adding easy Let’s Encrypt integration and client libraries very quickly.
- Caddy is a really nice simple-to-use web-server written in Go. It runs perfectly on the PiZero. It also has completely automatic Let’s Encrypt integration if you want it. So I stuck it in front of my Go server to turn it into a https server. Except life is never that easy.
- I hit two immediate problems:
- I’d have to drop no-IP for Dynamic DNS since I’m trying to register for my own https cert
- To stop baddies registering domains they don’t own, Let’s Encrypt calls back to you and insists on doing that on port 443. So my random high port number on my router wasn’t going to work
- Then I realised that my DNS provider, DNSMadeEasy has Dynamic DNS built-in. So I grabbed one of my parked domains and set it up with a Dynamic DNS A Record, giving it a dedicated password. But then of course I discovered that my Asus Router doesn’t have support for Custom Dynamic DNS out of the box.
- I quickly found the Merlin Firmware which is interesting. The standard Asus firmware is just a simplified fork of Tomato so Merlin forks again and adds back in the stuff that Asus removed. So you keep the same UI and general functionality, just with more customisation.
- Installation was a doddle and then I just had to whip up a simple script a few lines long to call out to DNSMadeEasy whenever the router’s IP address changed (see below).
- I then temporarily port forwarded 443 on the router to the Pi Zero and started Caddy with this incredibly complicated config file :-)
Caddyfile:
file
https://www.conorsdomain.com
proxy / localhost:9998
- Caddy saw that I wanted https, so it connected to Let’s Encrypt and a minute later I had everything necessary for my secure web-server.
Jaw-drop time
- Once the registration was done I could remove the 443 port forward and switch to a non-standard port
- I went over to Twilio and provided the new https://conorsdomain.com:9999 as the end-point to call. No joy. But a quick support ticket later and they made a change over the weekend(!) to fix it. Boom, everything working fine.
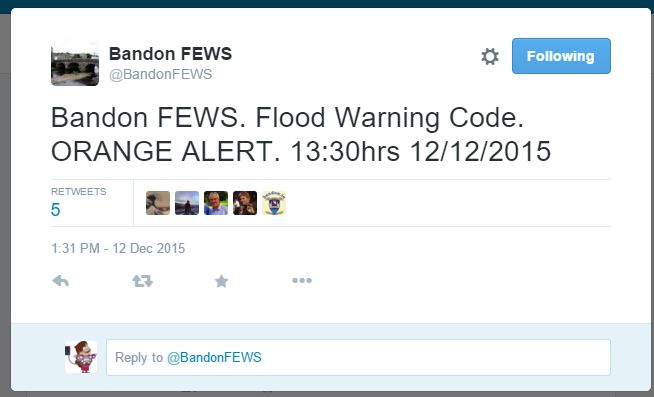
- With the terrible weather, I didn’t have to wait long for the first non-test SMS to appear. A couple of seconds later it was on Twitter:
Alternatives
- Of course I could exclude Twilio from this entire flow and call the end-point directly from Tasker but SMS will often work when no data connection is available.
- Having said that, the connection to the phone is a big worry as we are in a poor signal area. But registering my UK Twilio number on the Flood Warning site didn’t work (local warnings for local people) and I’m not paying $6 a month for an Irish number.
- In theory I could take the scraped data from the site and generate my own alerts but the Council rightly overrides the default trigger levels on occasion to warn people of impending flooding.
Go Code (See for https://gist.github.com/conoro/f1a3f7c5b96e2b033119 for latest)
package main

import (
	"encoding/json"
	"fmt"
	"log"
	"net/http"
	"net/url"
	"os"
	"strconv"
	"strings"
	"time"

	"github.com/ChimeraCoder/anaconda"
)

type Configuration struct {
	ConsumerKey       string
	ConsumerSecret    string
	AccessToken       string
	AccessTokenSecret string
}

func main() {
	file, _ := os.Open("conf.json")
	//file, _ := os.Open("conf-test.json")
	decoder := json.NewDecoder(file)
	configuration := Configuration{}
	err := decoder.Decode(&configuration)
	if err != nil {
		fmt.Println("config error:", err)
	}
	anaconda.SetConsumerKey(configuration.ConsumerKey)
	anaconda.SetConsumerSecret(configuration.ConsumerSecret)
	api := anaconda.NewTwitterApi(configuration.AccessToken, configuration.AccessTokenSecret)

	http.HandleFunc("/", func(w http.ResponseWriter, r *http.Request) {
		body := r.PostFormValue("Body")
		log.Println(string(body))
		if strings.Contains(body, "Bandon FEWS") || strings.Contains(body, "Met Eireann") {
			fmt.Fprintf(w, "Thanks for the update")

			a := []rune(body)
			if len(a) <= 140 {
				// Just post normal Tweet
				result, err := api.PostTweet(body, nil)
				if err != nil {
					fmt.Println(err)
				} else {
					fmt.Println(result)
					fmt.Println("Tweet ID: ", result.Id)
				}
			} else {
				// have to split into a Tweetstorm
				var originalTweetID int64
				var subTweet string = ""
				var tweetCount int64 = 0
				tweetParams := url.Values{}
				for i, r := range a {
					subTweet = subTweet + string(r)
					if i > 0 && (i+1)%137 == 0 {
						tweetCount++
						// Need to do normal first tweet but in_reply_to successive tweets
						if tweetCount == 1 {
							// Just Tweet and extract the ID from the response
							result, err := api.PostTweet("1/ "+subTweet, nil)
							if err != nil {
								fmt.Println(err)
							} else {
								fmt.Println(result)
								originalTweetID = result.Id
							}
						} else {
							// adding one second delay in Tweetstorm to prevent any throttling by Twitter
							time.Sleep(time.Second)
							// Tweet in reply to the first tweet by setting in_reply_to_status_id
							// originalTweetID
							tweetParams.Set("in_reply_to_status_id", strconv.FormatInt(originalTweetID, 10))
							result, err := api.PostTweet(strconv.FormatInt(tweetCount, 10)+"/ "+subTweet, tweetParams)
							if err != nil {
								fmt.Println(err)
							} else {
								fmt.Println(result)
							}
						}
						subTweet = ""
					}
					if i == len(a)-1 && subTweet != "" {
						// just Tweet whatever text is left at the end
						time.Sleep(time.Second)
						tweetCount++
						// Tweet in reply to the first tweet by setting in_reply_to_status_id
						// originalTweetID
						tweetParams.Set("in_reply_to_status_id", strconv.FormatInt(originalTweetID, 10))
						result, err := api.PostTweet(strconv.FormatInt(tweetCount, 10)+"/ "+subTweet, tweetParams)
						if err != nil {
							fmt.Println(err)
						} else {
							fmt.Println(result)
						}
					}
				}
			}
		}
	})

	log.Fatal(http.ListenAndServe(":8333", nil))

}
Asus DNSMadeEasy Update
This is smidge fiddly. More details here. Once you have Merlin installed and you are happily connected to the internet again (you did remember to write down all the settings for your ISP didn’t you?). You need to:
- Go to Administration -> System
- Enable SSH, which also obviously gives you SFTP
- Toggle “Format JFFS partition at next boot” to Yes
- Toggle “Enable JFFS custom scripts and configs” to Yes
- Click Apply
- SSH on to the box with your router’s Admin username and password
- Create a file called /jffs/scripts/ddns-start
- Make it executable (chmod 755 ddns-start)
- Copy these contents into ddns-start
#!/bin/sh
USERNAME="yourDNSMadeEasyUsername"
PASSWORD="TheSpecificPasswordYouSetOnThatDNSRecord"
IP=${1}
ID="TheSpecificRecordIDAssignedbyDNSMaseEasy"

curl -k "https://cp.dnsmadeeasy.com/servlet/updateip?username=${USERNAME}&password=${PASSWORD}&id=${ID}&ip=${IP}" >/dev/null

if [ $? -eq 0 ]; then
    /sbin/ddns_custom_updated 1
else
    /sbin/ddns_custom_updated 0
fi
- Do a reboot for good measure and you should see DDNS displaying success on the main dashboard